|
It's Fun To Plant
There is no more
satisfying experience than to plant trees, shrubs, and flowers and to
care for them until they become beautiful growing things. It is not difficult
to give plants the proper start if you just follow the directions in this
website.
Choosing The Right Location
Top of Page
Theoretically, you should have a landscape plan on paper, or at least
in mind, before you pick out your plants. Bring home the plants and they
will force you to develop a plan. Picture your tiny tree at full size.
Be sure it doesn't interfere with overhead lines and that it will frame
rather than block any views you favor.
The success of any planting depends on choosing the right location of
each plant. You should know, ask, or have a label that says whether each
kind needs sun, shade, or some of each. If not, check a garden book or
catalog or call your cooperative extension service for specific advice.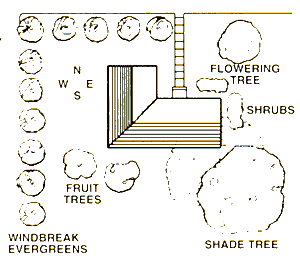
In most locations, evergreens
are best planted on the north and west of a house or property as windbreaks.
Deciduous trees on the south will give shade in summer and then lose their
leaves to let in the welcome winter sun.
Spacing the PlantTop
of Page
Many people make the mistake of planting too close, especially with trees
and shrubs that come so small and grow so large. This can result in stunted
growth, misshapen plants, extra pruning, poor air circulation, shade in
the wrong place, and trees that are dangerous instead of delightful.
Plant dwarf fruit and small
flowering trees at least 8 to 10 feet from buildings or from other small
trees. Place most foundation shrubs 3 to 4 feet from the house and beyond
the drip line of the roof or nature won't help with the watering.
Large trees with spreading
branches need a diameter of 35 to 65 feet for full development. They will
mesh with other trees as they do in a forest, but a house or building
offers solid obstruction, so plant accordingly. For very narrow areas,
get columnar trees or varieties.
Rose bushes can go from 2 to
6' feet apart depending upon the type and the region of the country.
Annuals and perennials should
go from 6 inches to 3 feet apart, depending on how large they are going
to grow. The closer you plant ivy and vinca, the sooner they will form
a solid carpet. If time and money are scarce, plant a small area at a
time and expand to new areas as plants multiply.
Location and Ground Preparation
Top of Page
Poor drainage can be a major cause of weak growth in new plants. Avoid
planting in places where water collects and stands after rainfall. Make
sure the location meets the sunlight needs of the plants you want to grow.
Prepare soil for planting flowers and vegetable beds by deep spading or
roto-tilling. Shrubs and trees just need well-dug holes in the sod; but
for good growth, the soil must be kept spaded two or three feet around
the plant and this area kept cultivated or mulched.
Planting in Heavy SoilTop
of Page
In some areas with heavy clay
soil and poor drainage, experts recommend that plants be set higher than
the soil level. Check drainage by filling the empty hole with water. If
it takes more than an hour to drain, you have a drainage problem. Try
breaking up the hard pan clay at the bottom of the hole and see if drainage
improves. If another location with better drainage isn't feasible, dig
the hole wider than normal and set the plant with about a fourth of the
root hall above ground level and mound soil around this.
Planting in Sandy SoilsTop
of Page
Dig the hole at least a few
inches deeper and add humus so it will hold more moisture longer. Add
as much as part of organic matter to 2 parts of original soil. Use only
decomposed material in the hole. Add enough of this soil mix to the hole
to be able to set the plant just above its original depth as grown in
the nursery. If there is any question, set the plant higher, not deeper,
since the soil may settle.
Digging the HoleTop
of Page
Do not skimp on this job. An old saying was "better a $5 plant in
a $50 hole than vice versa." But when this wisdom was carried too
far, tree roots refused to leave some comfortable holes and just encircled
the trunk until the tree died. So now we settle for a hole with just good
enough soil to ease the transition from nearly perfect container soil
to less than perfect garden soil. Experts now agree that a saucer-shaped
hole is superior in any soil since 90% of a tree's root system will develop
in the top 6"-12". A saucer-shaped hole allows for more expedient
accommodation of these vital uppermost roots.
Planting Balled & Burlapped
TreesTop of Page
(similar to planting balled trees)
- DIG A SAUCER-SHAPED HOLE
AT LEAST TWICE AS WIDE AND AS DEEP AS THE ROOT BALL
- SET TREE IN THE HOLE SO
10% OF ROOTBALL IS VISIBLE.
(See exceptions under heavy and sandy soils.)
- REMOVE ANY TIES OR STRAPS
THAT BIND IT. IF BURLAP STILL SHOWS AT THE TOP, TURN IT BACK SO IT WILL
BE BELOW THE SOIL SURFACE.
- FILL MIXTURE OF ORIGINAL
TOPSOIL AND ORGANIC MATTER AROUND THE BALL. PACK GENTLY. FILL HOLE WITH
WATER, LET SETTLE AND FINISH WITH MORE SOIL.
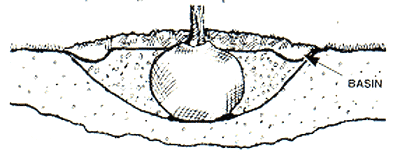
- DIG A 2"-3" DOUGHNUT
BASIN AROUND DRIP LINE AND WATER AGAIN.
- FINISH FILLING TOP WITH
A 3"-4" MOUND OF PEAT MOSS OR MULCH. KEEP MULT 3"-4"
FROM TRUNK.
|
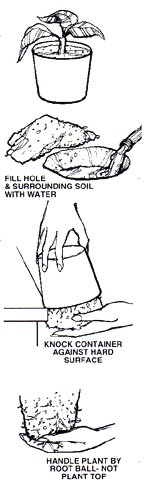
Planting from ContainersTop
of Page
More and more of our plants are coming from containers. Be sure
the soil is moist enough to hold together at planting time. Some
smaller plants, annuals and vegetables, are grown in peat pellets
or pots that can be planted pot and all. Often these have white
feeding roots growing through the sides by planting.
Dry soil in the surrounding
area can draw the moisture from the root ball; so turn your hose
on low and let it fill the hole and surrounding soil. When one hole
is wet enough, move the hose to the next one.
For plastic, clay, or any non-biodegradable containers, turn the
plant upside down, hold the trunk or stem in place with one hand,
and knock the side of the container against a hard surface. The
roots and soil should come, out easily in one unit. If knocking
harder does not accomplish this, a, cutaway the pot if possible.
It is better to waste the pot than to disturb roots any more than
necessary.
However if the roots
are seriously matted or encircling the root ball, loosen the outside
ones with a gentle massage.
Then set the root ball
carefully into the hole with the soil line of the tree slightly
higher than the surrounding soil to allow for settling. Which side
faces where is not crucial to the plant. For the good of the plant,
point the lowest branches toward areas of little activity so they
won't get broken. Where wind is a problem, turn the side with the
most branches into the wind.
|
|
Add backfill soil gradually
and firm gently to assure good root contact. Either throughout the process
or when the hole is almost level with the soil line, water slowly but
well, even if it is raining, until the soil in the hole has the consistency
of beef stew. The water will help the soil to settle and eliminate air
pockets. After the water is absorbed, finish filling and slightly mound
up with more soil to cover all roots and so that the new soil level is
about an inch above that of the surrounding area.
Staking and WrappingTop
of Page
At one time nurseries required
staking but experts then discovered that staking coddled the tree and
stifled its natural development of strength. So if your plant seems sturdy
and grows upright without staking, all the better. However, if you live
where there are constant high winds or your tree is over 8 feet tall,
you should stake the plants. Use soft rubber ties that avoid girdling
of the tree and allow enough movement to develop stem wood. Pound stakes
flush with the ground. Wrapping may not be necessary but has several benefits
in some situations, especially to prevent sunscald. It also limits damage
from insects, cats, children, rodents, and mowers. Wrap in overlapping
circles. Remove the wrap in the spring after the first growing season
and winter.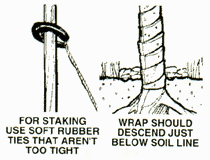
Watering PlantsTop
of Page
Lack of enough water during
the first growing season is a major cause of plant loss. The limited root
system on these plants makes them highly susceptible to dry weather damage.
Supplemental water is absolutely necessary. Wet the soil enough to soak
through to the base of the root system at each watering. Water the plant
twice a week during hot weather unless there is at least one inch of rainfall
per week or 10-days.
Handling Bare Root Stock
On ArrivalTop of
Page
Soak the entire plant in water for a few hours but no more than 24 hours
or at least cover. If possible, plant at once when shipment is received.
It is best to unpack the material sprinkle tops and all with water and
cover the roots with damp packing, sacks or canvas. If the weather is
too cold for planting, put the box or bundle in a cool but frost proof
place. If the weather is warm and you are not ready to plant, heel the
stock in.
Heeling In
Bare-Root StockTop
of Page

Temporarily plant your trees
in a place where they will have protection from the sun and wind, so their
development will not be retarded. All packing material and grass that
might harbor mice should be removed. Spread out roots and fill in with
pulverized earth rather firmly over them. Keep moist.
Planting Bare Root Trees
and ShrubsTop of
Page
Dig a saucer-shaped hole at least twice as wide as the spread of bare
roots. You may want to make a mound of good soil in the center of the
hole. Carry plants to the garden in the bucket of water. Then remove the
plant from the water and prune off any broken, twisted, or discolored
roots. Put a stick across the hole to mark the soil level. Hold the plant
in the planting hole with one hand so that the soil me on the trunk or
stem is about an inch above the stick. This line is usually
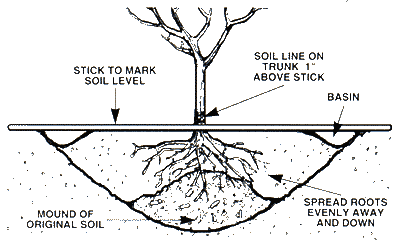
indicated by a change in color
or texture on the bark. With the other hand, spread the roots evenly away
and down so they will not be crowded. Fill soil in carefully around the
roots without letting the trunk level sink. Then follow the instructions
for the balled and burlapped and container plants.
PRUNING TREES AND SHRUBSTop
of Page
General PruningTop
of Page
Pruning is usually done continuously at the nursery and very little should
be needed when you get your plant home. However, it is now your plant
and you are free to shape it however you want to. You can make a shrub
into a tree or train an apple tree flat against a wall (espalier) if you
like. Certainly remove any parts that get broken in transit and any branches
that are crowded or crossing. Try not to leave two branches nearly opposite;
they will form a bad crotch when the tree is older. Over the years, as
a tree grows taller, you can remove lower branches for clearance, but
a tiny tree may well need all the leaf surface possible.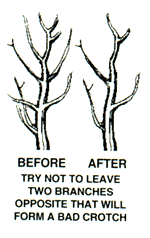
Fruit TreesTop
of Page
Since Fruit Tree Whips have no side ranches, simply cut off the top just
above a bud 2 to 2 1/2 feet from the ground. Protect young fruit tree
trunks from rodent and rabbit damage with collars of hardware cloth (galvanized
wire screen) 6 to 8 inches in diameter and 2 feet high, or use tree wrap.
NOTE: During heavy snowfalls (2 feet or more) you will need
higher protection from animal chewing damage.
Dwarf Fruit TreesTop
of Page
Plant with bud union (where fruit tree was grafted to root stock) at least
4 inches above the ground. Trunks should be tied to permanent stakes.
To plant, follow the same procedure described under "Planting Bare
Root Trees and Shrubs".
ShrubsTop of Page
Cut off damaged or frayed roots before planting. Thin out tops of many
branched shrubs, removing old wood. Cut tops back one-third to one-half.
Never allow roots to become dry. To plant, follow same same procedure
described under "Planting Bare Root Trees and Shrubs".
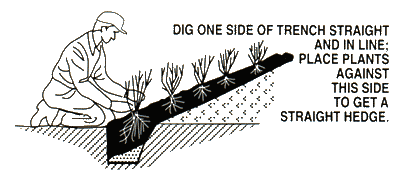
HEDGES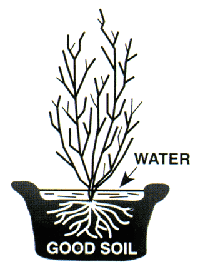 Top
of Page Top
of Page
Plant small shrubs which are
to form a hedge less than 2 feet in height 10 to 12 inches apart on center;
medium-sized bushes 12 to 18 inches apart on centers. Set tall shrubs
or trees for high hedges 2 to 4 feet apart. For the latter, it is often
more practical to dig individual holes than to set by the trench method.
Set hedges a trifle lower than they were in the nursery to get dense growth
at the bottom. Prune tops back 6 to 12 inches above the ground.
Each spring the hedge can be trimmed back to the desired height and width.
Frequent trimming during early summer will make the hedge grow dense.
Trim both the sides and the top, or else the hedge will grow wider at
the top and become open at the bottom.
How to Plant StrawberriesTop
of Page
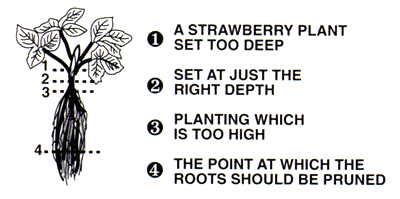
Hill System:
12 to 18 inches apart in rows 2 to 3 feet apart. Keep all runners nipped
off.
Matted Row:
Rows 4 to 5 feet apart, plants set 24 inches apart in row. Allow runners
to fill to 24 inches wide.
Roto-till or spade land deeply before planting. Plant by pushing spade
into ground to its full depth in spot where plant is to be. Press it to
one side, insert roots and spread them out in a fan shape and hanging
down to their full length. Set plant with crown at surface or a little
below. (See point #2 in illustration above.) Remove spade and press dirt
against roots.
Extremely long roots may be cut back for convenience in planting. Carry
plants in a pail of water. Water each plant after planting.
Planting Bush
FruitsTop of Page
Currants and
Gooseberries
Set 2 or 3 inches deeper than in nursery. Cut off half the tops. Plant
4 or 5 feet apart. Most currant or gooseberry pests can be controlled
by dusting or spraying with Rotenone. Always cut out infested canes.
Red & Black
Raspberries and BlackberriesTop of Page
Plant in good garden soil 3 to 5 feet apart in rows 6 feet apart. Set
Red Raspberry plants I to 2 inches deeper than they were in the nursery
and Black Raspberries 1-inch deeper. Firm soil over roots, and water.
Cut back all plants to about 6 inches in height. Don't let any fruit set
the first year. Allow new shoots to make rows 6 to 8 inches wide. After
fruiting each year, cut out old canes and burn, leaving a few vigorous
new ones to grow for fruiting the following year. These fruiting canes
should be cut back to about 2-1/2 feet early in the spring to encourage
fruiting laterals. Mulching always pays. In the spring, spray raspberries
and blackberries just before buds open, with lime sulfur or Bordeaux mixture.*
*(4-6-5O) Copper sulfate, hydrated lime and water
How to Plant
BlueberriesTop of
Page
Highbush Blueberries are a worthwhile addition to the home fruit garden--IF
soil requirements are right. Soil should be moist, light textured, contain
a high proportion of organic matter, with test acidity at pH 4.0 to 4.5.
Set bushes 6 feet each way. Mulch each year with 3 to 4 inches of sawdust
or peat. Cultivate shallowly because of shallow root system. Plant in
sun for good yields.
How to Plant
Broad-Leaved Evergreens,
Azaleas, Rhododendrons, Camellias, Etc.Top
of Page
These plants require an acid soil (about pH 5) either maintained or created
artificially, a moist situation but one with excellent drainage and a
light soil with a high proportion of humus. As they are shallow rooted,
plant them high, maintain at least a 3-inch mulch around them and never
cultivate. Where winter protection is necessary, spraying the foliage
with a wilt preventative is helpful or use a burlap screen for protection.
How to Plant RhubarbTop
of Page
Plant Rhubarb 3 feet apart in rich garden soil, with the buds 1 inch below
level of the ground. Fertilize rhubarb liberally with stable manure every
year.
How to Plant Asparagus (Green)Top
of Page
Set Asparagus 2 feet apart if in a single row, with rows spaced 3 feet
apart if in a bed. Plant to cover roots as for any perennial. Prepare
soil by spading plenty of humus and fertilizer into it. Asparagus likes
plenty of feeding so fertilize liberally with organic manure each year.
Start cutting stalks when they are as thick as your thumb. Never cut thin
stalks as they are probably young plants which will renew your bed. Stop
cutting June 1 to 15 to allow the bed to build up for the next year.
GrapesTop of Page
 |
Dig the hole broad and deep. Cut back to 2 or 3 strong buds. Plant
deep to prevent roots drying out. Fill the hole with compost or rich
soil. Plant firmly, water well and mulch top. The first year tie the
most vigorous shoot to a stake to form the trunk of the vine and frequently
remove all other shoots and suckers. |
How To Plant AnnualsTop
of Page
- First determine where you
plan to plant (sun or shade). Then choose the plant variety that best
grows in that light. Good drainage is also essential for best growth.
Standing water can rot roots quickly.
- Till the flowerbed 12 inches
or more deep. Add fertilizer and soil conditioners for future flowers
and healthy growth. Follow package instructions.
- Space each plant according
to its final growing size (width and height). Some crowding can make
the best-looking flowerbeds.
- Carefully remove plants
from the tray or pots. Disturb the roots as little as possible. Put
plants in holes about the same depth as they were in the container (slightly
deeper is 0. K.).
- Pinch off most current flowers.
The plant then puts its energy into the roots and getting established
in its new home.
- Water thoroughly for the
first weeks and do not let plants become dry…then water regularly.
- After growth is established,
prune all old faded flowers. This helps plants set new blossoms instead
of making seeds.
- For taller plants, a stake
will help support larger growth. Mulching your flowerbeds will help
control weeds. Weeds compete with your plants for water and nutrients,
so weed them out.
How To Plant PerennialsTop
of Page
The soil should be well worked
in specially prepared beds 2 to 2-1/2 feet deep with good drainage. Plant
food and plenty of humus are necessary ingredients for successful perennial
flower growing. Most perennials respond best if planted in a sunny location.
The average planting distance
for perennials is 1 foot apart. Vigorous growers like peonies and mallows
require as much as 3 feet.
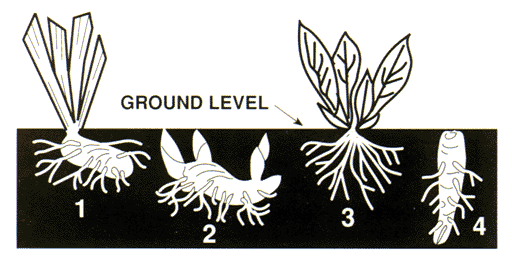
# 1 Plants (see illustration)
such as Iris should be planted with the roots below the surface of the
ground and the rhizome just on the surface.
# 2 Plants such as Peonies
should be planted with the tips of the buds just below the surface of
the ground (about 1 inch). Peonies will not bloom well if planted too
deeply or if deprived of ample plant food.
# 3 plants on which the leaves
spring from a crown should be planted with this crown just at the dirt
line.
# 4 plants with a fleshy root
such as Hollyhocks should be planted with the tap root straight down and
the bud just below the surface of the dirt.
In all planting, spread the
roots out naturally and do not crowd. Bring the soil in contact with all
roots and press firmly. Water thoroughly.
Most winter injury to herbaceous
perennials is caused by alternate freezing and thawing of the soil. A
mulch of salt hay, straw or leaves applied to the ground after it is frozen
will prevent injury to most perennials. Plants that maintain a crown of
green leaves through the winter, such as Shasta Daisies, will need special
protection in the way of mulch, which will not pack down and cause the
leaves to rot. Some plants, such as chrysanthemums, will benefit from
a mulch of sand.
Many perennials make rapid
growth and need dividing every few seasons. Large clumps produce mediocre
blooms because the inside roots are starved and crowded. Perennials may
be divided and reset in either early fall or spring.
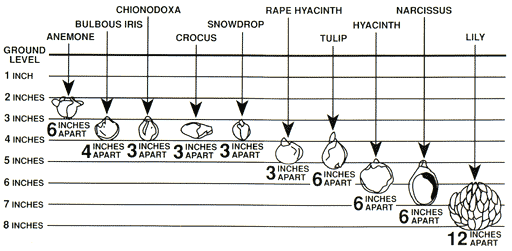
Plant Fall Bulbs for Spring
Flowers Top of
Page
Spring-blooming bulbs such as tulips, narcissi and hyacinths must be planted
in Fall-narcissi and the small bulbs like crocus in early Fall (September)-Tulips
and lilies as late as the ground is workable. Fall-planted bulbs should
be planted in specially prepared beds, which possess good natural drainage.
The most satisfactory soil for growing bulbs is a fibrous loam well supplied
with sharp sand and bone meal. Tulips should be planted deeper than indicated
(to 1 inch) if soil is not too heavy and their location is permanent.
Deep planting prolongs the effectiveness of the tulip bulb. Narcissus
can be planted in grassy areas or woodlands. Foliage must be allowed to
yellow before cutting.
How to Plant LiliesTop
of Page
The most desirable soil for
lilies is a loose sandy loam, which should be enriched by top dressing
of manure and should be well drained. Plant lilies in groups about 4 to
6 inches deep for base rooting types, 5 to 8 inches for stem rooting.
Tip bulbs on sides slightly and surround with a few handfuls of sand to
assure sharp drainage around each bulb. They may be left in the ground
year to year.
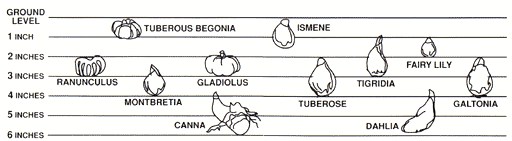
How to Plant Summer Flowering
Bulbs and Tubers Top
of Page
Most summer flowering bulbs are warm weather plants. Don't plant too soon.
Cannas, Tuberous Begonias and Dahlias may be started in flats indoors
and set out after danger of frost. Tritomas should be planted in early
Spring. Gladioli can be planted at 10-day intervals for a succession of
bloom allowing 70 to 90 days for maturity.
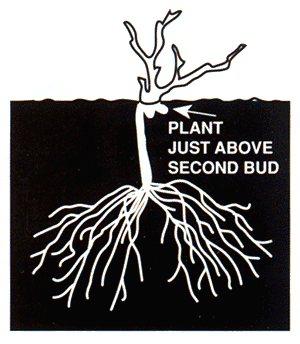
How To Plant Roses Top
of Page
Select a site that receives
at least 6 hours of sunlight each day and drains well. Don't plant roses
too close to trees or shrubs whose roots will compete for soil nutrients.
A site with good air circulation helps prevent disease.
When the soil is poor, dig
out the beds to a depth of 18 inches to 2 feet. Mix the soil with 25%
peat moss and about 10% compost or well-rotted manure.
Rose plants purchased in containers
should be removed-following procedure recommended by grower for type of
container used-and set in ample holes to proper depth. Fill in with soil
and water generously to eliminate air pockets.
To plant dormant bare root
roses, dig holes large enough to accommodate roots without crowding, and
deep enough to set them at the proper height.
The lower part of the bud union
or crown of the plant should be level with the surface of the ground in
mild climates 2 to 3 inches below in severe climates. Spread the roots
so they point downward at a forty-five degree angle. Build a mound or
cone of soil in the hole under the base of the bush to help in spreading
the roots. Cover the roots with loose soil, working it well underneath.
Fill the hole 3/4 full and
tamp soil down firmly; water well. Fill hole and mound over top 6 inches
until growth starts to prevent drying out of canes.
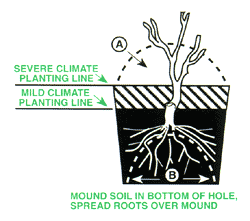
Winter protection of roses
in severe climates should consist of an 8-inch earth mound (see "A"
on the illustration) over the base of the bush. In milder climates a 3-inch
earth protection is sufficient. Rose foliage is a vital part of the rose
plant. Do not cut it lavishly through the growing season. Spray or dust
regularly. Roses like cool roots. A 3-inch mulch of peat moss or other
suitable material keeps soil cool, conserves moisture and prevents weed
growth.
General Care after PlantingTop
of Page
Pruning Trees and Shrubs: Established plants are pruned only for cultural
or maintenance purposes. Improving structure is of primary importance.
Work for uniform spacing of main stems and branches; thin out weak growth;
eliminate weak crotches; raise the head of a tree gradually by removing
the lowest branches, starting at least 2 years after planting. Keep shrubs
shapely and restricted by heading-in young growth. Drastic pruning of
shrubs should be done only by removing old wood to ground. Prune roses
in spring.
Pruning Narrow-Leaved EvergreensTop
of Page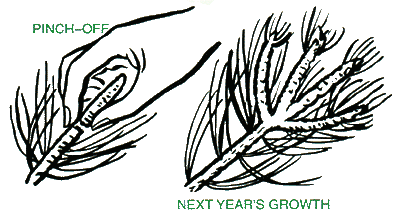
Narrow-leaved evergreens may
be kept thick and shapely and their growth suitably restricted by cutting
back the ends of the branches. Pinching back a part of the tender, new
growth is the simplest and usual method. Maintaining a neat evergreen
hedge requires cutting back whenever the growth becomes irregular.
Pruning Broad-leaved Evergreens.
Tip-prune the branches just before new growth starts to keep shrubs thick.
Head back longer growth if necessary. Removal of faded flower clusters
from Rhododendron, Laurels and Andromedas to prevent seed formation is
usually adequate pruning for them.
CultivationTop
of Page
Frequent, shallow cultivation will control weeds and produce a dust mulch
to conserve much needed moisture in the soil.
MulchingTop
of Page
For ornamental trees, shrubs and evergreens, a mulch of peat, grass clippings,
composted manure, marsh hay or straw may be used instead of dust mulch.
WateringTop
of Page
Artificial watering of new plantings during dry spells is necessary for
several years. Give the plant all the water the soil around it will take
at one time. Make certain evergreens have ample moisture in the Fall.
FertilizingTop
of Page
After the first year, fertilize trees regularly. One quarter pound of
a commercial nitrate fertilizer, per year of growth, broadcast under the
spread of the branches in Spring is excellent. (See section on compost
piles too.)
Small fruits and shrubs respond
to the same treatment.
Roses benefit from regular
applications of fertilizer through the Spring and Summer. Foliar and liquid
feeding methods are effective.
Insect PestsTop
of Page
There are two classes of bugs and insects that may attack trees and plants.
The first class (sucking) can be killed by hitting each individual with
the insecticide (spray or dust). The second class (chewing) eats the plant
tissue and is best controlled by poisons that they take into their stomachs.
Remedies for Sucking InsectsTop
of Page
Soft-bodied, sap-sucking insects such as aphids, white flies, red spiders
and mealy bugs, are best controlled by miticide, sevin or other appropriate
insecticide. Rotenone or pyrethrum compounds should be used on vegetables
since they are non-poisonous to humans.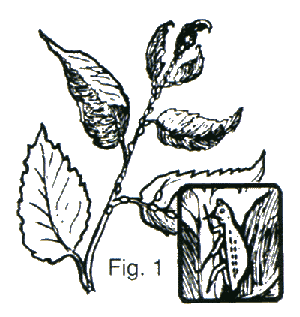
Hard-bodied sap-sucking insects,
like scale which sucks the juice from the twigs or branches rid trunk,
are best controlled by some dormant pray, such as lime sulfur solution
or miscible oil.
Common Aphids - an insect that sucks out the vital juices of the plants.
It is found on the young growth and on the under-side of the leaves. The
leaves usually wither and curl on the infested part.
Remedies for Chewing InsectsTop
of Page
Leaf-eating insects (see figure 2), such as beetles, weevils, grubs, worms,
etc., are controlled by poison applied to the leaf. Rotenone or pyrethrum
should be used on vegetables. Sevin is effective on some insects like
leaf miners and webworms in lawns.
A.common worm is one form of chewing pests. Chewing insects eat the leaves
of the plant entirely or eat holes in the leaves.
For quick-answers to pesticide
related questions call.
1- 800 - 858 - PEST (7378).
Available 365 days a year at no charge.
Plant DiseasesTop
of Page
Good culture, sanitation and certain fungicides will aid materially in
preventing plant diseases. Use disease-resistant varieties and well-grown
stock. Keep your plants healthy with adequate food, water and enriched
soil. Destroy infected or harboring material. Control insects which spread
disease by spraying.
Combinations of fungicide and insecticide chemicals are time savers for
the small garden. These materials come under various trade labels. Manufacturers'
instructions should be rigidly followed. Those containing heavy metals
(lead based, etc.) should be avoided.
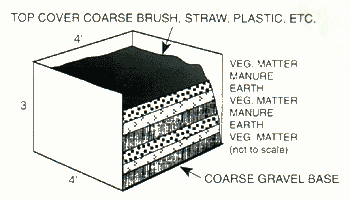
Starting A Compost Pile
(one method)Top of Page
It is possible to use your
yard waste (leaves and grass clippings) to make a compost pile. Properly
maintained, such piles rapidly convert vegetable and animal matter into
a beneficial fertilizer and soil conditioner known as humus. Autumn is
a convenient time to start, because of available material from the summer
season.
- Start with some kind of
container, about 4 x 4 x 3 or more feet high, of wood, brick or wire
mesh.
- The ideal mixture may be
a 6-inch layer of vegetable matter, a second 2-inch layer of some sort
of animal matter (usually manure), a thin layer of soil, a sprinkling
of lime or limestone, then water and repeat the process.
- Put in materials as they
become available. Alternate "green" layers of vegetable matter
with "dry" layers of weathered material. Keep moist.
- As decomposition gets under
way, the pile will shrink. A natural activator such as 10-5-10 fertilizer
can be substituted for the manure. We recommend you pick up a pamphlet
that goes into much more detail than we can here. Books have been written
on the subject of composting.
AnnualsTop
of Page
- 1. First determine where
you plan to plant (sun or shade). Then choose the plant variety that
best grows in that light. Good drainage is also essential for best growth.
Standing water can rot roots quickly.
- 2. Till the flowerbed 12
inches or more deep. Add fertilizer and soil conditioners for future
flowers and healthy growth. Follow package instructions.
- 3. Space each plant according
to its final growing size (width and height). Some crowding can make
the best looking flower beds.
- 4. Carefully remove plants
from the tray or pots. Disturb the roots as little as possible. Put
plants in holes about the same depth as they were in the container (slightly
deeper is 0. K.).
- 5. Pinch off most current
flowers. The plant then puts its energy into the roots and getting established
in its new home.
- 6. Water thoroughly for
the first weeks and do not let plants become dry...then water regularly.
- 7. After growth is established,
prune all old faded flowers. This helps plants set new blossoms instead
of making seeds.
- 8. For taller plants, a
stake will help support larger growth. Mulching your flowerbeds will
help control weeds. Weeds compete with your plants for water and nutrients,
so weed them out.
Getting StartedTop
of Page
- Pick the location ·
Light · Soil · Space
- Select plants
- Peat, compost or soil amendments
- Mulch
- Tools · space ·
spading fork · pick
· hoe · trowel · hose · watering can
· pruning shears or scissors
· staking kit · tree wrap
Some facts may vary
by region. Please check with your lawn and garden dealer if concerned
about possible variations.
|